
A loose or outdated toilet paper holder may be a small bathroom problem, but it is one you notice every day. The roll rattles, the base pulls away from the wall, or the holder no longer matches the other fixtures in the room.
This guide takes you through the complete job in six practical steps: removing the old holder, repairing the wall, choosing the new position, drilling and installing anchors, mounting the replacement, and checking the finished result. You will also learn which holder style works best for different bathrooms and how to solve the problems that commonly appear during installation.
Gather Your Tools and Materials
Collect everything before taking the old holder off the wall. The exact tools depend on the holder and wall surface:
- New toilet paper holder: confirm that the package includes the mounting plates, screws, set screws, template, and instructions.
- Screwdriver set: most holders use Phillips screws, although some use flat-head screws.
- Hex key: concealed holders often use a small hex set screw underneath the base.
- Drill and suitable bits: use a wood bit for studs, the anchor manufacturer’s specified bit for drywall, and a tile or masonry bit for hard surfaces.
- Tape measure and pencil: for positioning and marking the new holes.
- Small level: especially important for two-post holders.
- Stud finder: useful for finding solid support and checking for metal or live wiring.
- Wall anchors or toggle bolts: required when the screws cannot enter a stud or solid backing.
- Utility knife and plastic putty knife: helpful when paint, caulk, or adhesive surrounds the old base.
- Patching compound, putty knife, sandpaper, primer, and paint: needed if the old holes will remain visible.
- Painter’s tape: useful for marking tile and reducing drill-bit movement.
- Safety glasses and vacuum: for safe drilling and quick cleanup.
Before removing anything, open the new package and hold the mounting plate against the old holder. If the screw spacing is different, plan to patch the existing holes or move the new holder slightly. Also check that the holder has enough projection for the rolls you normally buy. A mega roll may have a much larger outside diameter even when its width is close to a standard roll.
Step 1: Remove the Old Toilet Paper Holder
This is usually simple once you understand how the decorative body is attached. Do not pull hard until you have checked for hidden set screws.
Locate the Set Screws
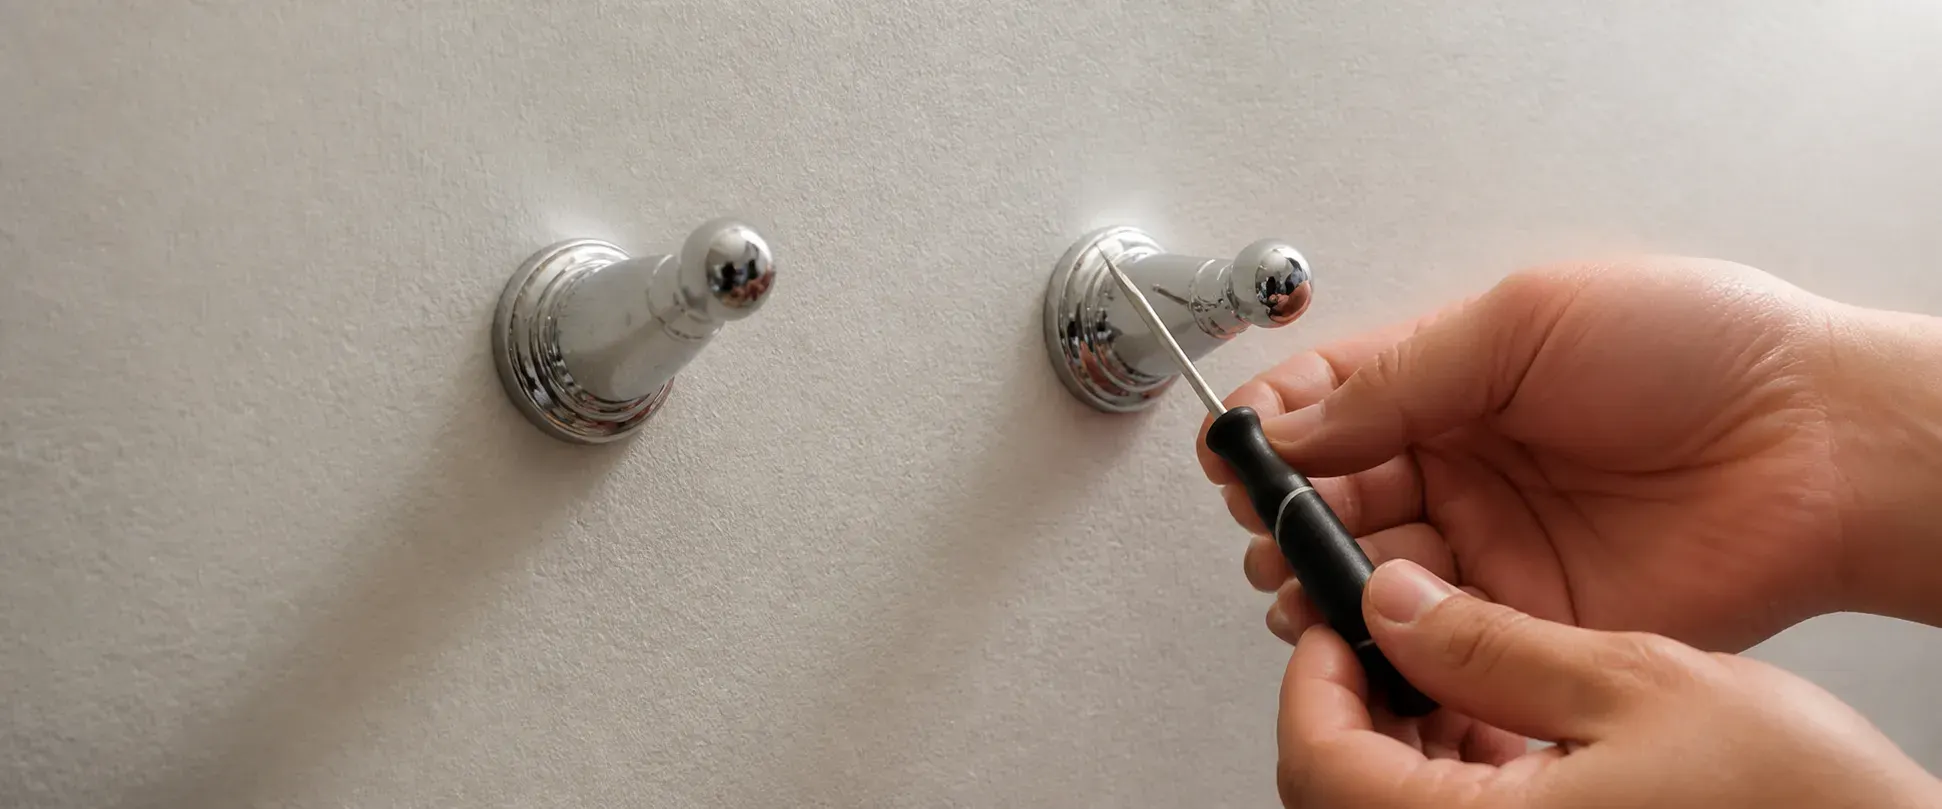
Look underneath each base where the holder meets the wall. Most concealed-mount holders have a tiny screw that locks the visible body onto a metal mounting plate. It may require a small hex key, Phillips screwdriver, or flat screwdriver.
If you cannot see a screw, look for a narrow slot, spring tab, or removable decorative cap. Some older holders slide upward or pull outward after a tab is released. Score around the base with a utility knife if paint or caulk has sealed it to the wall.
Loosen the Screws and Detach the Holder
Loosen the set screws a few turns. You usually do not need to remove them completely. Support the holder with one hand, then slide or lift the body away from the mounting plate. Remove the paper roll, spring spindle, pivot arm, or cover first if it makes the holder easier to handle.
Place a folded towel below the work area when the bathroom has a tile floor. It can prevent a dropped metal part from chipping the surface.
Remove the Mounting Brackets
Once the decorative body is off, remove the screws holding the metal brackets to the wall. Keep light outward pressure on the bracket if a screw spins without backing out; the anchor may be turning inside the drywall.
Remove the old anchors if they are loose or no longer needed. Plastic anchors may pull out with pliers, screw-in anchors can usually be unscrewed, and the wings of a toggle bolt normally drop behind the wall after the screw is removed.
Assess the Wall
Inspect the old holes and the surrounding surface. Clean, solid holes in a stud may be reusable if the new bracket aligns. Enlarged holes, torn drywall paper, cracked filler, or spinning anchors must be repaired or avoided. Reusing a failed anchor is one of the main reasons a replacement holder starts wobbling soon after installation.
If the old holder is glued on: warm the adhesive gently with a hair dryer and work dental floss, fishing line, or a plastic putty knife behind the pad. Move slowly instead of levering one corner away from the wall. Use only an adhesive remover that is safe for the paint, tile, glass, or wall panel.
Step 2: Repair and Prepare the Wall
A clean, flat mounting area gives the new holder a more secure and professional finish. Complete the wall repair before marking new holes.
Clean the Area
Remove dust, soap residue, loose paint, old caulk, and adhesive. A mounting plate installed over a raised paint edge or hardened caulk can rock even when its screws feel tight.
Patch Small Holes
For small unused holes in drywall, remove loose paper and fill the openings with spackle or patching compound. Apply a thin layer with a putty knife and allow it to dry fully. Remember that filler is a cosmetic repair; it should not be used as the structural support for a new screw.
Repair Larger or Damaged Holes
If an anchor has pulled through the wall, use a drywall patch suitable for the damaged area. Mount the new bracket into sound drywall, a stud, or solid backing rather than placing a new anchor into the edge of the repair. When the holder must remain in nearly the same position, a properly sized toggle anchor may reach undamaged material behind the wall.
Handle Old Tile Holes
Clean unused holes in tile and fill them with a compatible color-matched repair material or sanitary sealant. Even if the new base covers the opening, sealing it helps prevent moisture from entering the wall assembly.
Sand, Prime, and Paint
Sand the dry repair until it is flush, wipe away the dust, apply primer when needed, and touch up the paint. Let the finish dry before installing the new holder. Rushing this stage can leave visible edges around the new base.
Step 3: Position the New Toilet Paper Holder
Correct placement is about comfort as well as appearance. The roll should be easy to reach without twisting backward, and it should clear the toilet, wall, cabinet, and bathroom door.
Find a Comfortable Position
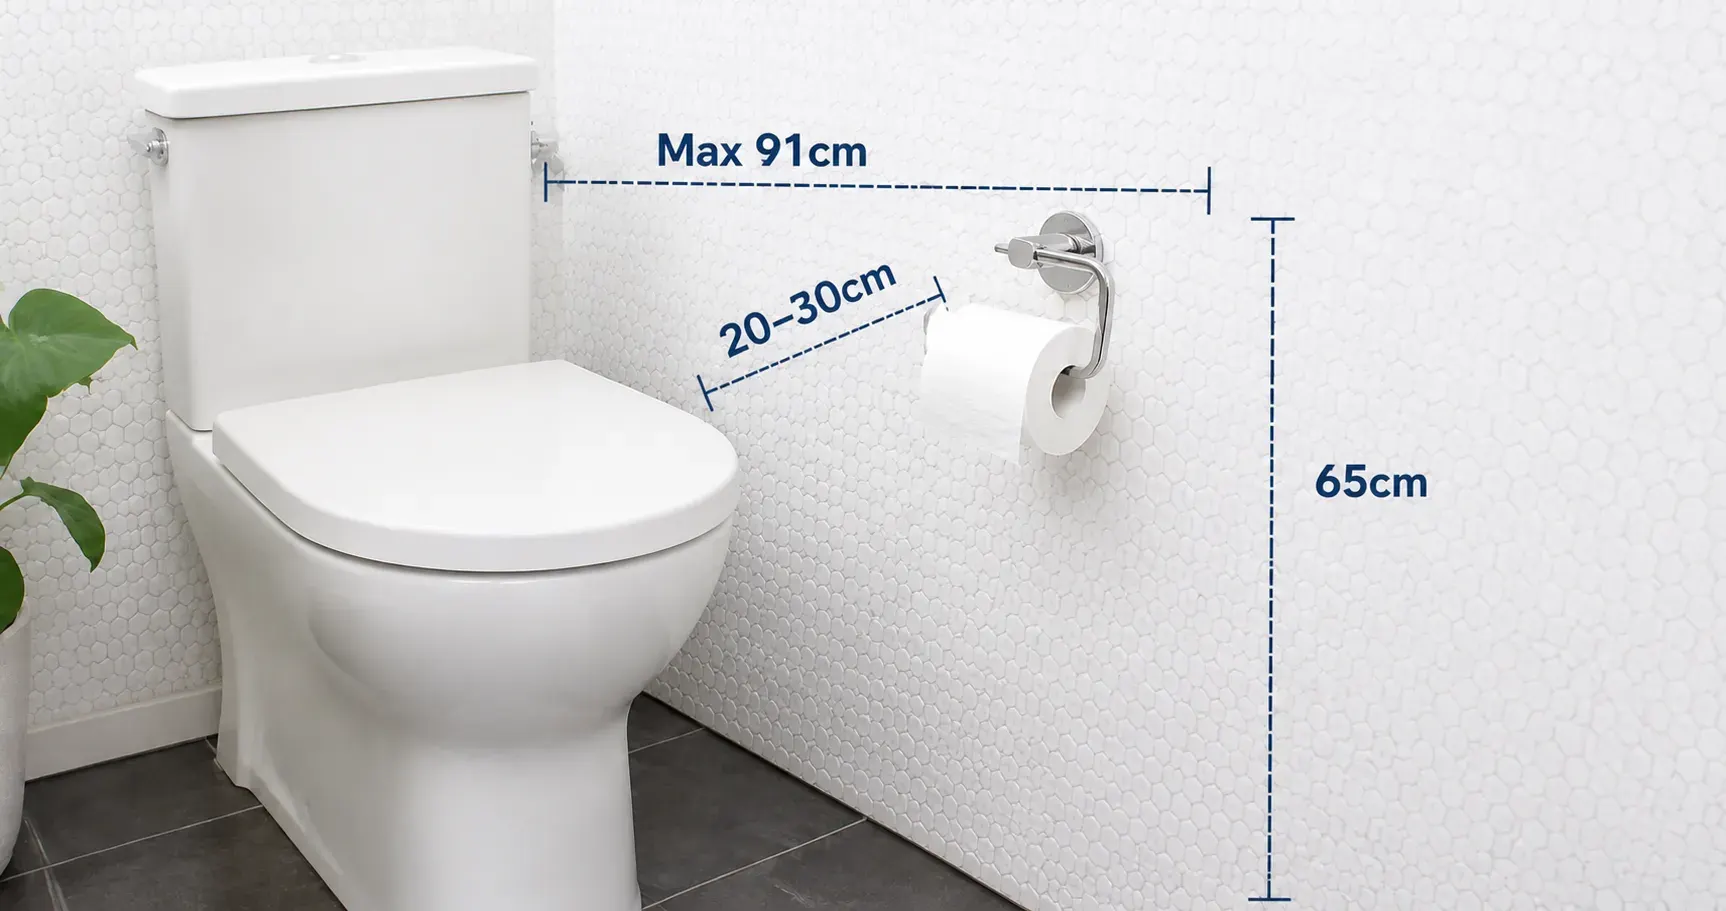
A common residential starting point is around 26 inches above the finished floor and slightly in front of the toilet bowl. Treat that as a starting point, not a rule. Sit on the toilet and reach naturally to find the best position for the people who use the bathroom.
If possible, mount at least one bracket into a stud or solid blocking. Also check both sides of the wall for outlets, plumbing fixtures, and other clues that pipes or wires may be hidden behind the proposed drilling point.
Check the Holder With a Full Roll
Place the largest roll you expect to use on the new holder and hold the complete assembly against the wall. Make sure the roll can rotate without rubbing. Width, outer diameter, and core size are different measurements; the toilet paper roll size guide explains how they affect holder fit.
For an open-ended holder, point the opening away from the normal pulling direction so the roll is less likely to slide off. For a pivot holder, make sure the arm has room to lift.
Mark the Screw Holes
Hold the mounting bracket or paper template against the wall. Use a level to keep it straight, then mark the center of each screw hole with a pencil. For a two-post holder, measure the distance between the brackets carefully and compare it directly with the holder body before drilling.
Check the marks one final time by holding the fully assembled holder in place. It is much easier to move a pencil mark than to repair another hole.
Step 4: Drill the Holes and Install Anchors
Select the drill bit and anchor according to the material behind the finished surface. Wear safety glasses, keep the drill straight, and limit the drilling depth so the bit cannot travel farther into the wall than necessary.
Choose the Correct Drill Bit
- Wood stud: use a pilot bit slightly smaller than the solid center of the screw.
- Drywall anchor: use the exact hole size specified by the anchor manufacturer.
- Ceramic or porcelain tile: use a bit designed for that tile. Porcelain often needs a diamond bit.
- Concrete or brick: use a masonry bit matched to the plug or masonry screw.
Drill the Pilot Holes
Drill perpendicular to the wall. An angled hole can pull the bracket out of position. On tile, place painter’s tape over the mark, begin at low speed, and use light pressure. Do not use hammer mode while passing through the tile. After reaching the backing material, switch to the bit required for that substrate.
If the proposed hole may be close to a concealed pipe, electrical cable, waterproof membrane, or expensive tile edge, stop and choose another position or ask a professional to check the wall.
Install the Anchors
When no stud is available, insert anchors designed for the wall thickness and the repeated pulling force on the holder. Some anchors twist into drywall; others require a drilled hole; toggle anchors open behind the wall. Install each one according to its instructions and keep the front flange flush with the surface.
Do not place an anchor into an enlarged or crumbling hole. Move to sound material or repair the wall first. Do not overdrive an anchor until it crushes the drywall face.
Step 5: Mount the Brackets and Holder
This is the stage where the replacement begins to look finished. Work gradually so the bracket stays level and the anchors are not stripped.
Attach the Mounting Brackets
Place the brackets over the pilot holes or anchors in the orientation shown by the holder instructions. Start every screw by hand before tightening any one screw fully. This leaves enough movement to make a final level adjustment.
Tighten the Screws Evenly
Use a screwdriver or a drill with a low clutch setting. Tighten until the bracket is flat and firm, then stop. Excessive torque can spin a drywall anchor, bend the bracket, compress the wallboard, or crack tile.
Attach the Holder Body
Slide the decorative bases onto the brackets or engage the tabs as directed. If the holder will not sit flush, do not force it. Check that the brackets face the correct direction, the screw heads are not protruding, and no debris is trapped behind the base.
Tighten the Set Screws
Tighten the small screws underneath the bases until the holder no longer moves. They should lock the body to the bracket without stripping the threads. Install the spindle, pivot arm, shelf, or cover after both bases are seated correctly.
Test for Movement
Give the holder several normal paper-pulling motions. It should remain level and should not rock at the wall. Do not hang body weight from it; a toilet paper holder is not designed to work as a grab bar.
Step 6: Final Touches and Troubleshooting
Remove pencil marks, drilling dust, fingerprints, and adhesive residue. Load a fresh roll and confirm that it rotates freely, tears cleanly, and cannot slide off during normal use.
Common Problems and Quick Fixes
- The holder wobbles: tighten the set screws first. If the mounting plate moves, remove it and replace the failed anchor.
- A screw spins without tightening: stop turning. The anchor has probably stripped or is rotating in an oversized hole.
- The holder does not sit flush: check bracket direction, screw-head height, wall debris, and paint or caulk ridges.
- The bar looks crooked: loosen one bracket, level the assembly, and correct the spacing before retightening.
- The new base does not cover the old holes: patch and paint the holes or use a purpose-made backing plate.
- The roll rubs against the wall: reposition the holder or choose a model with more projection for large-diameter rolls.
- The roll slides off an open arm: reverse the holder so the open end faces away from the pulling direction.
Choose the Right Toilet Paper Holder for Your Bathroom
The installation method matters, but so does the style of holder. Consider how quickly rolls need to be changed, how much space is available, and who will use the bathroom.
Spring-Loaded Holder
This familiar two-post design holds the roll securely and suits traditional bathrooms. Accurate bracket spacing is important because the spring spindle must fit between the posts.
Pivot-Arm Holder
The arm lifts from one side so the roll can be replaced without compressing a spring spindle. It is convenient for children, older users, and anyone with limited hand strength.
Open-Ended Holder
A single arm makes roll changes fast and gives the bathroom a simple, modern appearance. Correct orientation prevents the roll from sliding off while paper is pulled.
Recessed Holder
The holder sits partly inside the wall, saving space in a narrow bathroom. Installation is more involved because the opening must fit the holder and avoid framing, pipes, and wiring.
Freestanding Holder
This is ideal for renters or bathrooms where drilling is not allowed. Choose a weighted base that remains stable while paper is pulled.
Adhesive Holder
An adhesive mount can work well on clean, smooth tile or glass. Follow the surface preparation and cure time exactly. It is usually less reliable on textured walls, wallpaper, grout lines, or peeling paint.
Which Type Should You Choose?
- For a rental or no-drill installation: choose a freestanding or surface-compatible adhesive holder.
- For the fastest roll changes: choose a pivot arm or open-ended design.
- For a classic and secure fit: choose a spring-loaded holder.
- For a small bathroom: consider a recessed holder if the wall construction allows it.
- For large or mega rolls: choose a holder with enough projection and test the full roll diameter before drilling.
- For a shelf or phone platform: use stronger anchors because users may place extra weight on the holder.
Match the finish to nearby faucets, towel bars, cabinet hardware, and shower fittings for a more coordinated bathroom. Also consider cleaning: simple shapes with fewer joints are easier to wipe down.
Frequently Asked Questions
Can I replace a toilet paper holder without drilling?
Yes. Use a freestanding holder or an adhesive model approved for the surface. Adhesive holders need a flat, clean, dry surface and must cure for the full recommended time before use.
How do I remove a toilet paper holder that is glued on?
Warm the adhesive gently with a hair dryer, then work line or a plastic putty knife behind the mounting pad. Remove residue with a cleaner that will not damage the wall finish.
What if the new holder does not cover the old holes?
Patch, sand, prime, and paint the unused holes before installing the replacement. A decorative backing plate can also cover a sound repair when repainting the full area is difficult.
Why does my toilet paper holder keep coming loose?
The set screws may be loose, or the wall anchors may no longer grip. Remove the holder and inspect both parts. Use a stud when possible or install a better anchor in sound wall material.
What screws should I use?
Use the manufacturer’s screws when they match the wall. For a stud or wood cabinet, use suitable wood screws. For drywall, tile, or masonry, pair the screw with an anchor designed for that substrate.
Should a toilet paper holder be vertical or horizontal?
Horizontal is the most common orientation and works with nearly every roll. A vertical holder can save width and create a modern look, but the roll still needs to rotate freely and stay on the arm during use.
How do I remove old wall anchors?
Pull plastic anchors with pliers, unscrew self-drilling anchors, and remove the screw from a toggle bolt so its wings can drop behind the wall. Patch any opening that will not be reused.
What height should the holder be?
Around 26 inches above the finished floor is a common residential starting point. Confirm the final position by sitting on the toilet and reaching naturally. Commercial and accessible bathrooms must follow their applicable project requirements.
Will a mega roll fit the holder?
It will fit only if the holder has enough space for the roll’s outer diameter. Check the largest roll you plan to use before drilling the mounting holes.
Match the Toilet Paper to the Holder
Once the new holder is secure, make sure the paper roll matches its available width, diameter, and core design. Sempo Paper supplies household, hospitality, and commercial toilet paper with customizable dimensions, ply, sheet count, embossing, packaging, and private-label support.


